


Creating a nursery that reflects your family’s personality goes beyond picking a theme or color palette. Many parents struggle to find decor that feels truly unique and meaningful, especially when store-bought options lack that personal touch. Wooden shapes offer an ideal canvas for customization, letting you craft one-of-a-kind pieces that grow with your child. This guide walks you through two proven methods for personalizing wooden nursery decor, from gathering materials to achieving professional-looking results that add warmth and character to your baby’s space.
Table of Contents
- Key takeaways
- Gathering materials and preparing wooden shapes
- Sticker painting method: step-by-step guide
- Mod Podge and coloring pages technique for vibrant decoration
- Troubleshooting common mistakes and tips for best results
- Discover unique personalized wooden nursery decor
- How to personalize wooden shapes: frequently asked questions
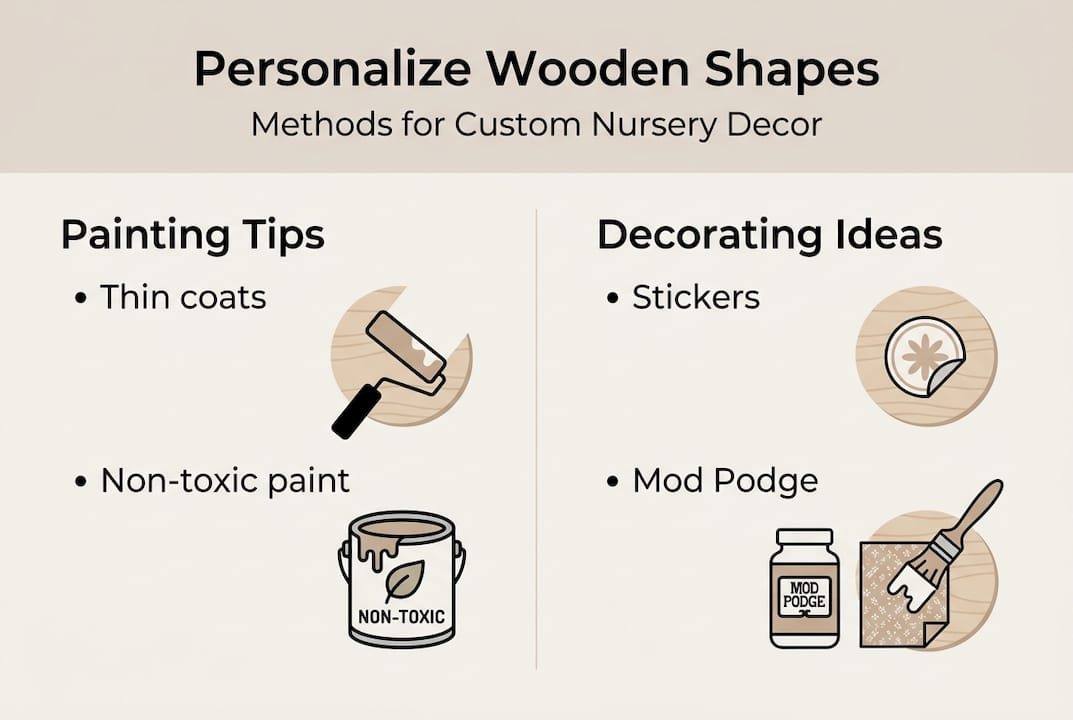
Key Takeaways
| Point | Details |
|---|---|
| Sticker painting method | Adhesive letters or shapes act as masks to create crisp, professional looking designs. |
| Mod Podge coloring option | Layer color with Mod Podge to build depth and seal the finish for durable results. |
| Safe preparation steps | Sanding smooths surfaces and using non toxic paints reduces risk when children explore the decor. |
| Customization adds value | Personalized wooden decor adds meaningful uniqueness to a nursery that store bought items cannot match. |
Gathering materials and preparing wooden shapes
Before starting your personalization project, assembling the right materials and preparing your workspace sets you up for success. Choose smooth pine blocks or pre-cut wooden letters as your base, checking for any rough edges or imperfections that need attention. Pine works beautifully because it accepts paint well and sands easily, while harder woods like maple offer durability for pieces that will see heavy handling.
For painted projects, select non-toxic, toy-safe acrylic paints specifically labeled for children’s items. These water-based formulas dry quickly and emit minimal fumes, making them ideal for nursery projects. You’ll also need fine-grit sandpaper (220 grit works perfectly), clean cloths for dust removal, and painter’s tape if you want crisp edges. Consider your child’s developmental stage when deciding between natural and painted finishes, as natural wood proves safer for infants who explore through mouthing, while painted surfaces provide visual stimulation that captivates preschoolers.
Set up your workspace in a well-ventilated area with good lighting, protecting surfaces with newspaper or a drop cloth. Gather alphabet stickers, various paintbrush sizes, Mod Podge adhesive, and printed coloring pages if you’re trying that method. Keep paper towels and a cup of water nearby for quick cleanup. Organization matters because you’ll work more efficiently when everything sits within arm’s reach.
Sanding represents the most critical preparation step that many beginners skip. Run your hand over every surface of your wooden shape, feeling for splinters or rough patches. Sand in the direction of the wood grain using gentle, even strokes until the surface feels smooth as glass. This process takes only five minutes but dramatically improves paint adhesion and prevents rough edges that could snag tiny fingers. Wipe away all dust with a slightly damp cloth and let the wood dry completely before moving forward.
Pro Tip: Test your paint on a scrap piece of wood first to ensure the color matches your vision and the consistency spreads evenly without streaking.
For wooden lettering nursery decor projects, arrange your letters on a flat surface to visualize spacing before you commit to any permanent changes. This preview helps you catch design issues early and adjust your approach.
Sticker painting method: step-by-step guide
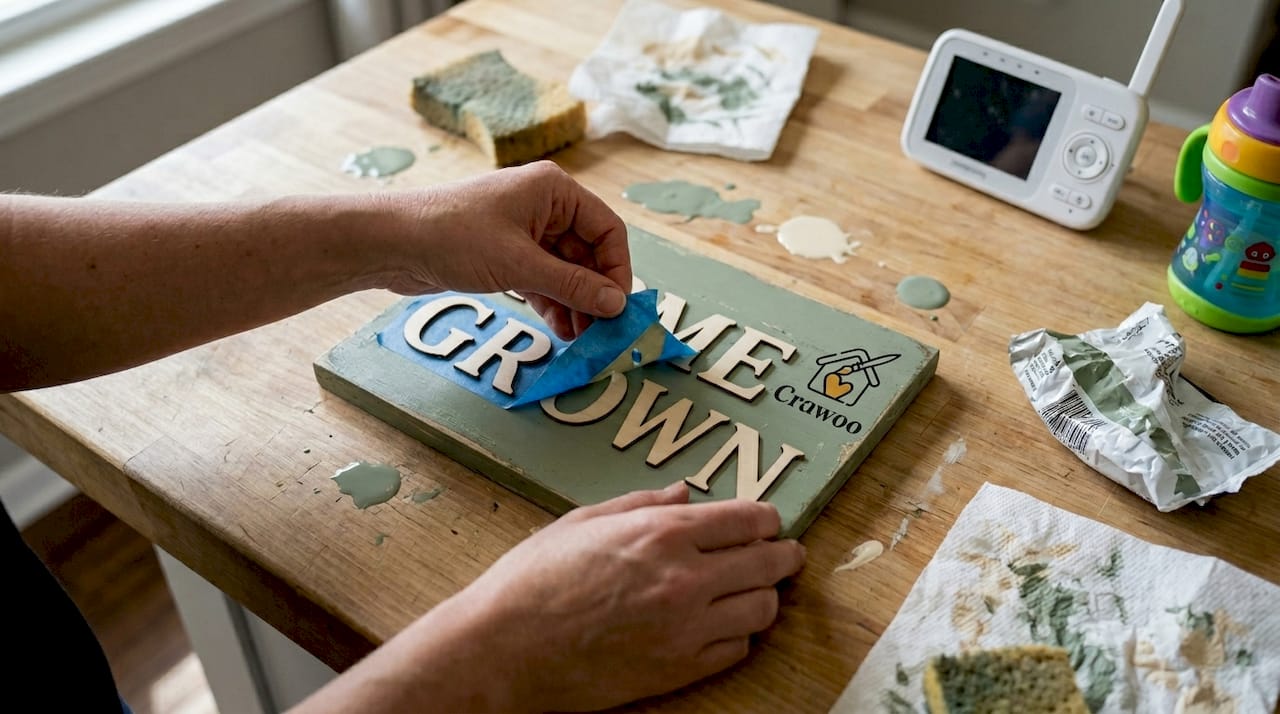
The sticker painting technique creates crisp, professional-looking designs by using adhesive letters or shapes as masks that protect wood beneath them. This method works exceptionally well for name blocks, alphabet sets, or geometric patterns that need clean edges. Parents love this approach because it requires minimal artistic skill yet produces impressive results that look store-bought.
Start by following these steps in order:
- Sand your wooden shape thoroughly and wipe away all dust particles with a clean, dry cloth
- Position alphabet stickers or vinyl shapes on the wood surface, pressing firmly from center outward to eliminate air bubbles
- Run your fingernail along sticker edges to seal them completely against the wood
- Apply your first thin coat of paint using smooth, even strokes that cover both stickers and exposed wood
- Let this coat dry for 30 minutes before assessing coverage and applying additional thin layers
- Wait 24 hours after your final coat before carefully peeling stickers away at a 45-degree angle
The sticker painting process delivers toy-safe results when you use thin coats rather than one thick application. Thick paint seeps under sticker edges, creating blurry lines that ruin the crisp effect you want. Multiple thin coats also prevent paint from cracking or peeling when the wood expands and contracts with humidity changes.
Timing matters significantly with this method. Rushing the drying process leads to smudged edges when you peel stickers, while waiting too long can make stickers harder to remove cleanly. Set a timer rather than guessing when paint has dried sufficiently. If you notice paint bleeding under stickers during application, stop immediately and let that coat dry before continuing.
Pro Tip: Warm your stickers slightly with a hairdryer on low heat before applying them, as this makes the adhesive more pliable and helps create an airtight seal against the wood.
“The beauty of sticker painting lies in its forgiveness. If you make a mistake, sand it smooth and start over. Each layer teaches you something about paint consistency and application pressure.”
This technique shines for painting wooden nursery signs because it handles intricate lettering that would challenge freehand painting. You can create matching sets by using identical color schemes across multiple pieces, building a cohesive look throughout the nursery.
Mod Podge and coloring pages technique for vibrant decoration
The Mod Podge method opens creative possibilities beyond solid colors by transferring detailed designs from coloring pages onto wooden surfaces. This approach suits parents who want intricate patterns, illustrations, or themed artwork without possessing advanced painting skills. Adult coloring books provide perfect source material because their designs scale well and feature bold lines that translate beautifully to wood.
Execute this technique by following these steps:
- Select coloring pages with designs that complement your nursery theme and color them completely with markers or colored pencils
- Cut your colored design slightly larger than your wooden shape, allowing for precise trimming after initial placement
- Brush a thin, even layer of Mod Podge directly onto the wood surface where the design will sit
- Position your colored page carefully, smoothing from center outward to eliminate wrinkles and air pockets
- Trim excess paper along the wood edges using a craft knife for clean lines
- Apply two to three thin topcoats of Mod Podge over the entire surface, allowing 20 minutes drying time between coats
The Mod Podge application requires approximately 15 minutes for prep work, 2 hours of active crafting time, and 2 hours for final drying, with total material costs around $15 for supplies that complete multiple projects. This technique costs less than purchasing custom printed decor while delivering comparable visual impact.
Brush strokes matter when applying Mod Podge. Use long, smooth strokes in one direction rather than scrubbing back and forth, which creates bubbles and streaks. Work quickly once you’ve applied the adhesive because it starts setting within minutes. If bubbles form under your paper, gently lift that section and reapply it while the Mod Podge remains wet.
| Project Phase | Time Required | Materials Needed | Cost |
|---|---|---|---|
| Design selection and coloring | 30-45 minutes | Coloring book, markers | $8 |
| Cutting and preparation | 10-15 minutes | Scissors, craft knife | Included |
| Mod Podge application | 15-20 minutes | Mod Podge, foam brush | $7 |
| Drying between coats | 60-90 minutes | None | $0 |
| Final sealing | 10 minutes | Additional Mod Podge | Included |
Pro Tip: Choose matte Mod Podge for a natural look or glossy finish for vibrant colors that pop against nursery walls, matching your overall design aesthetic.
This method works brilliantly for custom wall letters nursery decor because you can coordinate designs across multiple letters while maintaining visual consistency. Mix and match patterns or create an ombre effect by gradually shifting color intensity across a name.
Troubleshooting common mistakes and tips for best results
Even experienced crafters encounter challenges when personalizing wooden shapes, but knowing how to prevent and fix common issues saves time and materials. The most frequent problem involves paint application thickness. When you apply paint too heavily in a single coat, it pools in corners and creates an uneven surface that takes forever to dry. Worse, thick paint often bubbles or cracks as it cures, ruining your careful work.
Watch for these warning signs and solutions:
- Paint bleeding under stickers indicates insufficient edge sealing or paint that’s too thin; press sticker edges firmly and slightly thicken your paint consistency
- Bubbles forming under Mod Podge mean you’ve trapped air; smooth paper more carefully from center outward and pop bubbles immediately with a pin
- Rough texture after painting suggests you skipped sanding or applied paint over dust; always sand and wipe clean before starting
- Colors appearing dull or streaky point to inadequate mixing or old paint; stir thoroughly and check expiration dates
- Stickers tearing when removed indicate waiting too long after painting; peel within 24-48 hours for best results
Material safety deserves special attention in nursery projects. Verify that every product you use carries non-toxic certification and specifically states suitability for children’s items. This matters because babies explore their world through touch and taste, potentially mouthing decorative pieces within reach. Consider natural wood’s benefits for younger infants while painted finishes better serve preschoolers who respond to visual stimulation.
| Method | Pros | Cons | Time | Cost |
|---|---|---|---|---|
| Sticker painting | Crisp edges, simple technique, minimal materials | Limited to solid colors, requires steady hand for sticker placement | 45 minutes plus drying | $15-20 |
| Mod Podge coloring | Intricate designs, unlimited patterns, highly customizable | Longer process, potential for bubbles, requires precision cutting | 2-3 hours plus drying | $15-25 |
| Natural wood finish | Safest for infants, showcases wood grain, requires less maintenance | Limited color options, shows wear more obviously | 15 minutes for sanding | $5-10 |
Pro Tip: Keep a detailed photo record of your process, noting paint brands, drying times, and techniques that worked well, creating a reference guide for future projects or when friends ask for advice.
“The difference between amateur and professional-looking results often comes down to patience. Rushing drying times or skipping preparation steps shows in the final piece. Give each stage the time it deserves.”
When working on wooden name sign guide nursery projects, test your complete process on a practice piece before tackling the final version. This trial run reveals potential issues with your specific materials and workspace conditions, letting you adjust your approach without risking your good wood.
Discover unique personalized wooden nursery decor
While creating your own personalized pieces brings satisfaction, sometimes you want professionally crafted wooden decor that captures your vision without the time investment. Ready-made options let you focus on other nursery preparations while still achieving that custom look you’re after.
Explore thoughtfully designed pieces in our wooden sign collection, featuring styles from minimalist modern to whimsical woodland themes. Each piece uses high-quality wood and non-toxic finishes that meet safety standards for nurseries. For something truly one of a kind, custom wooden nursery signs let you specify names, colors, and design elements that match your exact vision. Parents particularly love unique wood wall art for nursery options that combine personalization with artistic flair, creating focal points that grow with your child from infancy through their early years.
How to personalize wooden shapes: frequently asked questions
Is it safe to paint wooden shapes for infant rooms?
Yes, painted wooden shapes are completely safe for infant rooms when you use non-toxic, toy-safe paints specifically formulated for children’s items. Look for products labeled as water-based, lead-free, and compliant with ASTM safety standards. Allow painted pieces to cure fully for at least 72 hours before placing them in the nursery, ensuring all fumes have dissipated. Keep painted decor out of reach if your infant is in the mouthing stage, or choose natural wood finishes instead.
What non-toxic paints are best for nursery projects?
Water-based acrylic paints marked as toy-safe or certified non-toxic work best for nursery wooden decor projects. Brands like Apple Barrel, DecoArt Americana, and Folk Art offer affordable options that meet safety standards while providing excellent coverage and color selection. Avoid oil-based paints or spray paints unless specifically labeled for children’s toys, as these often contain harmful volatile organic compounds. Always check for ASTM D-4236 certification, which indicates the product has been evaluated for safety.
Can Mod Podge be used on all types of wood?
Mod Podge adheres successfully to most wood types including pine, birch, maple, and plywood, though porous woods like pine accept it most readily. Extremely dense woods like oak may require light sanding to create texture that helps the adhesive grip properly. Avoid using Mod Podge on oiled or waxed wood without first removing those finishes, as they prevent proper bonding. For best results, work with raw, unfinished wood or lightly sand painted surfaces before application.
How long does it take for personalized wooden decor to dry fully?
Drying times vary by method and environmental conditions, but plan for 24 to 48 hours for complete curing. Acrylic paint feels dry to touch within 30 minutes but needs 24 hours to cure fully before handling. Mod Podge requires 72 hours for complete curing, though it feels dry after 2 hours between coats. Humidity and temperature significantly affect drying, with warm, dry conditions speeding the process while cold or humid environments extend it. Never rush curing by using heat guns or placing pieces in direct sunlight, as this causes cracking.
What are the benefits of natural wood vs painted finishes?
Natural wood finishes offer superior safety for infants who explore through mouthing, eliminating any concern about paint ingestion while providing pleasing tactile experiences. The wood grain’s visual interest and warm tones create calming environments that many parents prefer. Painted finishes excel at providing bold visual stimulation that engages preschoolers and allows precise color coordination with nursery themes. Painted pieces also hide wood imperfections and offer unlimited creative possibilities through color combinations and patterns that natural wood cannot achieve.
Recommended
- Buy Custom Wood Name Signs Nursery, baby name signs for nursery online
- How to personalize wooden decor for baby nursery 2026
- What is personalized wooden decor: create a unique nursery
- Buy Wooden baby’s names on shelves online
- 7 kreative personalisierte Geschenke zum 1. Geburtstag – Herzensprojekt Manufaktur
Subscribe to Our Newsletter
Leave a comment