


Combining different wood finishes in a nursery feels overwhelming for many new parents. You picture a warm, inviting space for your baby, but the moment you start mixing a honey-toned crib with a darker dresser, doubt creeps in. Will it look chaotic? Will the tones clash? The good news is that mixing wood tones can look intentional and beautiful with the right approach. This guide walks you through every step, from planning your palette to verifying the final look, so you can create a nursery that feels personal, cozy, and completely yours.
Table of Contents
- Why mix wood decor styles in the nursery?
- What you need before you begin: tools, materials, and planning tips
- Step-by-step: How to mix wood decor styles for a harmonious nursery
- Common mistakes and troubleshooting tips
- Verifying your work: How to check balance and harmony
- Inspire your nursery with personalized wooden decor
- Frequently asked questions
Key Takeaways
| Point | Details |
|---|---|
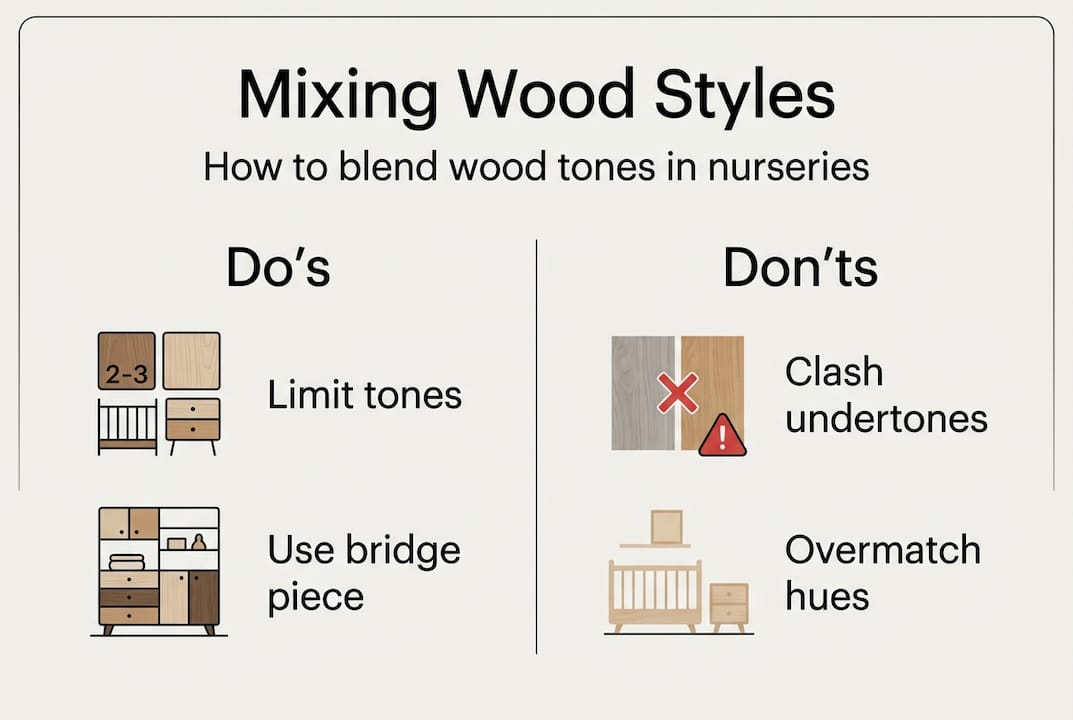
| Limit wood tones | Choose one dominant wood and one to two accent tones for a cohesive nursery. |
| Match undertones | Pair woods with similar warm, cool, or neutral undertones to create harmony. |
| Prioritize safety | Always use non-toxic, zero-VOC finishes for all nursery wood surfaces. |
| Use bridging elements | Rugs, textiles, and metals help connect different wood styles and soften contrasts. |
Why mix wood decor styles in the nursery?
Many parents assume that a nursery should stick to one wood tone to look polished. That instinct is understandable, but it actually works against you. A single tone throughout a room can feel flat and one-dimensional. Mixing wood styles, on the other hand, creates visual depth and warmth that makes a space feel lived-in and loved.
The timeless appeal of wood in nurseries comes from its natural variation. No two pieces of wood are identical, and that variety is exactly what makes a room feel rich and layered. The key is doing it with intention rather than by accident.
Following current nursery wood decor trends shows that blended wood styles are more popular than ever, and for good reason. They allow you to mix furniture from different sources, update pieces over time, and build a room that grows with your child. As one trusted resource puts it, mixing wood tones adds warmth and visual interest when done thoughtfully.
Top three benefits of mixing wood decor styles:
- Warmth: Layered tones create a cozy, inviting atmosphere that a single-tone room rarely achieves.
- Versatility: You can mix furniture from different stores or eras without the room looking accidental.
- Lasting style: A blended palette ages gracefully and adapts as your child grows.
What you need before you begin: tools, materials, and planning tips
Before you start rearranging furniture or ordering new pieces, a little preparation goes a long way. Having the right materials on hand means fewer surprises and a smoother process from start to finish.
Safety is the first priority in any nursery project. Always choose non-toxic, zero-VOC finishes on nursery wood pieces, since babies chew on crib rails and touch every surface. VOC stands for volatile organic compound, which refers to chemicals that off-gas from paints and finishes and can irritate a baby’s developing lungs. Zero-VOC products eliminate that risk entirely. You can find more guidance on choosing safe wood finishes before making any purchases.
| Supply | Why it matters |
|---|---|
| Wood tone swatches | Lets you compare tones side by side before committing |
| Zero-VOC finish samples | Confirms safety and color before full application |
| Color wheel | Helps identify warm, cool, and neutral undertones |
| Inspiration photos | Guides your palette and keeps decisions consistent |
| Soft textiles and rugs | Serve as bridges between contrasting wood tones |
Collect inspiration photos from nursery accounts, catalogs, or even your baby’s toys. Colors in soft furnishings often point you toward a natural wood palette that already works. Once you have your swatches and inspiration gathered, review your wood decor care needs so you know how to maintain each finish long-term.
Pro Tip: Always test a small patch of any finish on a hidden area of the wood piece and let it cure for 48 hours before applying it fully. Lighting in your nursery can shift how a tone looks dramatically.
Step-by-step: How to mix wood decor styles for a harmonious nursery
Now that your materials are ready, here is the process broken into clear, manageable steps.
- Identify your dominant wood tone. Start with the largest piece in the room, usually the crib, the floor, or the dresser. This piece sets the foundation. According to design principles, identify a dominant wood tone from the largest item, then complement it with one or two additional tones.
- Choose one or two secondary tones. Pick tones that are either lighter or darker than your dominant piece. Contrast is your friend here. A medium-toned crib pairs beautifully with a lighter shelf and a darker accent chair.
- Match undertones for harmony. Every wood has an undertone, either warm (orange, red, yellow), cool (gray, green), or neutral. Warm tones work best with other warm or neutral woods. Mixing a warm oak with a cool gray-toned wood creates tension that is hard to resolve.
- Balance light, medium, and dark. Aim to have at least two of these three values represented in the room. This creates depth without chaos.
- Repeat each tone at least twice. If your changing table is walnut, echo that tone somewhere else, like a small wooden toy box or a picture frame. Repetition creates cohesion.
- Use textiles and metals as bridges. A cream wool rug, linen curtains, or brushed brass hardware can soften the transition between two wood tones that feel slightly different. These elements act as visual connectors.
| Dominant tone | Secondary tone | Bridge element |
|---|---|---|
| Medium oak crib | Light pine shelves | Cream linen curtains |
| Dark walnut dresser | Light birch rocker | Jute rug, brass lamp |
| Natural maple floor | Medium cherry furniture | White painted bookshelf |
Pro Tip: In a small nursery, limit yourself to two or three wood finishes total. More than that in a compact space creates visual noise rather than warmth.
For hands-on inspiration, explore DIY nursery wood decor ideas that show how real parents have blended tones successfully. You can also learn about nursery wood craftsmanship to understand what makes quality pieces worth investing in.
Safety note: Any wood surface within reach of your baby, including crib rails, shelves, and toy boxes, must be finished with a certified non-toxic, zero-VOC product. Babies chew and mouth surfaces constantly, so this is non-negotiable regardless of how beautiful a finish looks.
Common mistakes and troubleshooting tips
Even with a solid plan, a few common mistakes can throw off the balance of your nursery. Knowing what to watch for makes it easy to course-correct before you are fully committed.
The most frequent issue is using all one tone. It sounds safe, but using all light tones risks a mismatched look because slight variations between pieces become more obvious, not less. Adding deliberate contrast actually makes the room look more intentional.
Another common problem is clashing undertones. A warm honey oak next to a cool gray-washed wood will always feel off, no matter how much you rearrange. The fix is to introduce a neutral bridge element, like a white-painted piece or a natural linen textile, between the two.
Unsafe finishes are a mistake that cannot be undone easily. If you have already applied a finish and are unsure of its safety, consult the manufacturer’s safety data sheet before placing the piece in the nursery. Explore nursery wood accessory selection for pre-vetted options that take the guesswork out of safety.
Quick troubleshooting solutions:
- Room feels flat: Add a darker accent piece or a deep-toned textile to create contrast.
- Tones feel chaotic: Remove one wood tone and replace it with a painted or neutral piece.
- Undertones clash: Introduce a jute rug or cream-colored textile as a visual buffer.
- Finish looks wrong under nursery lighting: Retest your swatch under both natural and artificial light before reapplying.
Pro Tip: Take a photo of your nursery layout on your phone and step back to look at it on a small screen. Reducing the image size helps your eye see the overall balance rather than individual pieces.
Verifying your work: How to check balance and harmony
Once your pieces are arranged, it is time to evaluate the room as a whole rather than piece by piece. This final check is where everything comes together.
Stand in the doorway and look at the room from a distance. Your eye should move naturally around the space without getting stuck on any one area. If something feels heavy or out of place, it usually means one tone is overrepresented or a bridge element is missing. Balance tones for depth and use bridging elements to soften transitions between contrasting pieces.
Check the room under different lighting conditions. Natural morning light, afternoon sun, and evening lamp light all shift how wood tones read. A tone that looks warm and golden at noon can appear flat under a cool LED bulb at night.
For a fresh perspective, ask your partner or a friend to walk in and share their first impression. First reactions are honest. If they say it feels cozy and warm, you have nailed it. If they hesitate, ask them to point to what feels off. Adding nursery wood wall art is often the finishing touch that ties a blended palette together beautifully.
Final harmony checklist:
- Each wood tone appears at least twice in the room.
- Light, medium, and dark values are all represented.
- Undertones across all wood pieces are consistent (all warm or all neutral).
- At least one bridge element connects contrasting tones.
- All finishes are certified non-toxic and zero-VOC.
- The room feels balanced from the doorway under multiple lighting conditions.
Inspire your nursery with personalized wooden decor
Now that you have mastered mixing wood decor styles, imagine the impact a personalized wood piece can add to your baby’s room. A custom sign with your child’s name, crafted in a finish that matches your dominant tone, pulls the entire palette together in a way that no mass-produced item can.
At Crawoo, we create custom wooden nursery decor designed to complement any wood palette you have built. A custom wooden nursery sign can be finished to match your dominant tone or serve as a beautiful accent in a contrasting shade. Our round nursery name sign is a favorite for parents who want something timeless and personal. Every piece is made with baby-safe materials, so you never have to compromise on safety for style. Browse the full collection and find the piece that makes your nursery feel complete.
Frequently asked questions
Is it safe to use different types of wood finishes in a baby’s nursery?
Yes, as long as every finish you use is non-toxic and zero-VOC, it is safe for nursery surfaces that babies touch and chew. Always verify the product label before applying.
How many wood tones should I mix in a small nursery?
Stick to two or three tones for a balanced result. One dominant tone plus one or two secondary tones gives you contrast without visual clutter.
What if the woods in my nursery have clashing undertones?
Introduce a neutral bridge element between them. Rugs, textiles, or metals soften the transition and make mismatched undertones feel intentional rather than accidental.
Can I mix painted wood furniture with natural wood finishes?
Absolutely. A painted piece, especially in white or a soft neutral, acts as a visual reset between two natural wood tones and adds variety without competing with either finish.
Recommended
- Wood decor trends for nurseries: Safe, stylish ideas
- How to make wooden nursery decor: a 2026 guide
- Wood Décor Craftsmanship: Why It Matters for Nurseries
- Wooden nursery decor: safe, natural solutions for 2026
- How to Choose the Right Fabric | Beautiful Windows Elgin Fabric Guide – Shop Designer Fabrics by the Yard | Curtains & Drapery
Subscribe to Our Newsletter
Leave a comment